Saturday, March 3, 2012

Strawberries Galore!


See those magnificent ruby red gems?  They're beautiful, aren't they! Those strawberries are Florida Strawberries, directly from Plant City, Florida. I grew up in Florida. Well, part of the time, I grew up in Florida.  I also grew up in Maryland and in New Jersey. I was twelve when we moved to Tampa.
 
Do you remember twelve? It was a rocky year for me. Seventh grade. Two new schools- one in New Jersey, and then the one in Tampa. Then another new school for eighth grade. I hated Florida. I hated junior high. I hated life.  I'm blessed to have had a stable and happy family, one which my brother-in-law has likened to the Cleavers, to stick with me through that time (and every other tough time since). Even so, it's taken me quite some time to say, "I grew up in Florida," though I spent more years there than anywhere else in my life.  
But you didn't come here to read about my junior high angst. Everyone has that, and no one really wants to relive their own, let alone anyone else's!  What you really want to know about are those strawberries up at the top and what I did with them. I'm getting to that.
Look how pretty!
Did you know that Florida produces the bulk of the early in the year strawberries?  Probably around 95%, give or take a percent or ten. Summer strawberries come from California, but if you live anywhere around Plant City, you will start smelling the strawberries sometime in February.  Its a light smell- not like the citrus that blossoms later in the year.  At the end of February or sometimes as late as the beginning of March, Plant City hosts the annual Florida Strawberry Festival: a fair with a parade (which I have marched in!) and rides and strawberry shortcake booths.  You could always get a HUGE piece of freshly baked and assembled strawberry shortcake at one of those booths.  I learned something from them too.  Authentic shortcake is not angel food or lady fingers or white cake or pound cake-all of which taste great with strawberries.  Authentic shortcake is a biscuit.  Like the kind you eat for breakfast, but a bit sweeter.  No, really, it is!  And this is how you make it.

You need berries, flour, sugar, baking powder, butter, an egg, milk, and a can of whipped cream.

In a large-ish bowl, mix together 1/4-1/2 cup sugar, 2 cups flour, and 2 tsp baking powder.


Using two knives, cut in a stick of butter.  Keep cutting up the butter until your mixture resembles coarse crumbs.  This is sort of like making pie dough or biscuits.
See the big chunks of butter?
This is more like coarse crumbs.


Mix together 2/3 cup milk and an egg.  Beat it together well so that you don't see big clumps of eggwhite in the mixture.   (No picture here- you know how to beat an egg, right?!)
Make a well in the middle of your dry ingredients. Pour the egg-milk mixture into the well, and mix it all together with a fork.

Those knives on either side?  That's what I used to cut in the butter.

No need to dirty up the mixer, just stir it with a fork!


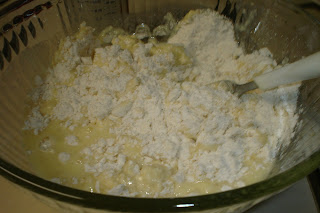
Don't mix it too long! You want it to be just combined (an important thing to note for any quickbread). No big dry clumps, and still kinda lumpy.

Lumpy? Yes! Dry clumps? NO!
Spread the mixture into a greased 8 inch cake pan. For picture purposes, I used my 9 inch spring form pan. This made my cake thinner and a little more difficult to cut. If you're not planning to take pictures or have a fancy presentation, use the 8 inch pan!
The dough is thick, not liquid, so spreading it evenly takes some patience. Just remember that the top layer doesn't need to be beautiful because it will be covered in strawberries and whipped cream!
Bake at 450 for 15-18 minutes or until a toothpick inserted in the middle comes out clean.

In the meantime, slice up your strawberries.  You'll need about 6 cups. I used 2 1/2 containers (16 oz). 
They're even beautiful cut up! 

 Add 1/4 cup of sugar to the berries and mix gently.
It might seem too much to put sugar on strawberries, since they are already sweet. However, the sugar draws the juice out of the berries, and turns into syrup, which is what we want on the shortcake.

Stirred gently.  See how they have a more shiny look than the picture up above before the sugar?  That's the juice that's turning into syrup. mmmm...
Once your shortcake is done, take it out of the oven and let it sit on a cooling rack for about 10 minutes before removing it from the pan. After you take it out of the pan, let it cool all the way.  After the shortcake has cooled, slice it in half horizontally so that you end up with two circles- a top and a bottom.
Okay, so remember how I said my shortcake was...short?  I didn't want it to fall apart, so this is the only "cut it in half" shot. Looks like a big cakey mouth... "Me want strawberries!"

Put the bottom half on your serving dish, or leave it in the pan. Spoon about half of the berries on the bottom part of the cake.
This is definitely easier to do with the high sides of the springform pan!

Make sure you get some of the berry juice too- it'll probably be in a pool in the bottom of the bowl!  Top the berries with whipped cream (you can use the canned stuff or make it yourself.  Homemade tastes better, but the canned stuff is easier!)
There's not much that tastes better than fresh strawberries and whipped cream...
Put the top half of the shortcake on top of the whipped cream layer- like a giant strawberry and whipped cream sandwich!

See how its all cracked and bumpy?  It doesn't matter because no one will see it!

Spoon the other half of the strawberries (and juice) on top of the cake,
At first I thought I would save some calories and be (semi) creative by using just a few puffs of whipped cream on the top...

 then cover with more whipped cream.
but then I decided that the strawberries looked to naked so I covered them up!
You can garnish with un-sugared cut strawberries if you like, or you can just serve it, which is what I did.

This just begs to be eaten!


 Just so you know... there's almost no way those individual pieces are going to come out looking ready for a photo shoot....
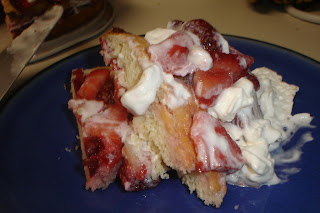
But it doesn't matter how un-photogenic they are...


...because they're going to taste wonderful!


 If it's possible, I think this tastes even better the second day (if you have any left over!) because the juices and the whipped cream soak into the cake.

I am not ashamed to say that I had a piece of this for breakfast.

Remind me to tell you about the time I grew up in Maryland and New Jersey!

What's cooking in your kitchen?

Monday, February 27, 2012

Now that its warm...

I wrote this post the second week of February.  Thought I posted it.  I was wrong!  So now that its getting warm, here's a nice recipe for soup!  Well, at least I tried!

Last night, I made one of the yummiest soups I have had in a long time.  I'm sort of proud of it too, because it was essentially me throwing things in my pot and having them turn out good together.  I had a minimal guidance from Serious Eats (one of my absolute favorite foodie sites!) but at least half of the inspiration for it came straight out of my own brain.

I don't actually have a name for this soup.  Maybe inspiration will strike before I finish this post...

So first, I sliced up a medium sized onion. Maybe it was on the large size of medium. 
Then I sliced up a Kielbasa sausage to go with the onion.
 And then I coarsely chopped up three stalks of kale, after removing the spines. (Spines of greens = yuck.)

Then, I peeled and cut up three large-ish russet potatoes. I have no picture of that. But you know what chopped up potatoes look like, right?! I thought so.
I poured some olive oil in the pot and started heating it.

\
After the oil got hot, I dumped in the onions, sausage, and kale, and stirred it all around until it was coated.  Really counted on that kale cooking down, because it took up SO MUCH ROOM in the pot.

The heat did wilt the kale, of course, and it sweated down the onions, too, so the big mass of chopped stuff I put in initially got pretty small in about 5 minutes.  Once there was room in the bottom of the pot, I smashed a couple of garlic cloves and threw them in there too.

After the garlic had a little time to get warm- but not brown-, I threw the potatoes in the pot and covered everything in 2 quarts of chicken broth. 


Sprinkled with salt (unmeasured, but maybe a teaspoon?) and a twist of freshly ground black pepper. And then a five finger pinch of Baby Bam (which I talked about a few editions back, when I made chicken soup.)  A five finger pinch being what you can grasp with the tips of your fingers and thumbs. Probably not as much as a tablespoon.

Bring it to a boil, and then turn it down to medium and let it simmer for a while.

I think I let it simmer for about an hour. Once the potatoes are soft, mash them into the broth with a potato masher or with a fork.


Let the soup simmer for 15 
more minutes, then serve.


 I think this would be excellent with some good crusty bread to soak up the broth. Alas, there was no crusty bread to be found.

I think I should call this... sausage and kale soup. Creative? Not really.  But I'm saving my creativity for cooking!

Speaking of which, what's cooking in your kitchen?

Wednesday, February 1, 2012

Bacon and Eggs and Linguine

We love to have breakfast for dinner at our house.  Some bacon, some eggs, some...linguine? 
Really, though, pancakes with bacon and eggs are a favorite.  But I don't always feel like making pancakes.  They can be rather time consuming: my griddle isn't very big, so I end up having to cook one pancake at a time. Plus they can be messy-batter dripped all over the counter, and the clean up is sticky.

Then, one day, as I was looking through one of my cookbooks, 1000 Best Ever Recipes (which is an enormous British tome my mother-in-law gave me; about 3 inches thick and 20 pounds!) I discovered a recipe for Carbonara, which is linguine with bacon and eggs.  It looked (and is) pretty simple to make. And it turns out so delicious that you'd think it took ages to make.

So, if I have bacon around, or pancetta, and I don't feel like making pancakes, I make Carbonara instead.  You can do it too;  it's easy!

Bring a large pot of water to boil.

In the meantime: cut up 8 oz of ham, bacon, pancetta, into 1 inch sticks. Saute in some hot olive oil for 3-4 minutes. Add about a cup of peas or, sliced mushrooms and fry for another 4 minutes.  Turn off heat.

Fryin' up the bacon. Or prosciutto, as is the case here.
When the water comes to a boil, put 12 oz of pasta in to boil.  I used linguine.  The recipe suggests fresh tagliatelle or spaghetti. You know, whatever pasta you have on hand will work!

Boiling the pasta
While the pasta is cooking, beat together 4 eggs, 5 tbsp half and half, and salt& pepper to taste.
Once the pasta is cooked, almost al dente, drain it, and put it back in the cook pot.  Put the ham, peas (or mushrooms), and any pan juices into the pot with the pasta and give it a stir.  

Pour the egg mixture and about a tablespoon of parmesan cheese over everything.  Stir it all together until the pasta is coated.  The eggs will cook in the hot pasta but stir it around for a few minutes just to be sure. 
All in the pot!
Serve the pasta into warm bowls & garnish with fresh grated parmesan and maybe even some fresh parsley or basil if you have it on hand.  This makes a bunch, and since it's so easy, its a great dish to serve for company. 
Pasta Carbonara!

What's cooking in your kitchen?

Sunday, January 29, 2012

Pot Lucks and Cheese Balls

I love a good pot luck.  They're a great time with friends, and people tend to bring either their favorite or their best dishes; it can be a good way to gain exposure to new foods. Tonight, we had an evening finger food potluck with a group from church.

The only thing about potlucks is that I am very indecisive, and so have a hard time choosing my favorite dish to take.  I also like to try out new recipes; while there's no reason not to do this at home, there's something exciting about sending an untried dish out to the world!  The other thing that makes it hard to decide is that I currently have a bunch of home-canned jams and jellies to use and choose from.  I like to incorporate them into pot-luck dishes as much as possible.

Tonight, I decided to make a cheese ball as inspired by of one of my new cookbooks: Paula Deen's Southern Cooking Bible. It made it possible for me to use some of my apricot habanero jelly AND to keep one of my resolutions- cooking out my new cookbooks!

I made some proportion changes to the original recipe, and I substituted walnuts for pecans. All in all, it was delicious.  Without sounding like a braggart (hopefully), I wasn't the only one who thought it was delicious: The whole plate was demolished before everyone got through the line!


Here's the ingredients-except the walnuts which I forgot to frame!

Here's what I did:

Chop finely 5 or 6 green onions, 2 large cloves of garlic, and half a cup of walnuts.


 Mix the chopped stuff in a bowl with 3 cups of shredded cheddar, 1/2 cup mayonnaise, and a half block of cream cheese at room temperature.


Also add 1/8 tsp salt and 1/8 tsp black pepper.  Mix this all together in a food processor or with a mixer.  Shape the mix into a ball, and wrap it in plastic wrap. Let it chill for a couple hours.

Take it out of the fridge and cut it in almost half- I made the top half a bit smaller- maybe a 1/3 to 2/3 proportion.  Make a divot in the bottom half.

mmm...cheese!
 Fill the divot with 1/4-1/2 cup of  spicy pepper jelly.
This is one of the jellies I made last autumn. Its not terribly spicy, so I added about 1/8 tsp of cayenne to half the jar before filling the cheese ball!

Put the top half back on top and use your finger to blend the edges together.  Press another half cup or so of chopped walnuts over the top and sides of the ball.  Serve with crackers.
This makes a pretty large cheese ball- 3 cups of cheese and about 2 1/2 cups of other stuff.

As you can see- nothing left.  If you make it, I hope you enjoy it as much as my friends and I did!

The remains of the... evening.
What's cooking in your kitchen?